Design Mode
Design Mode is where you define the shape of your data. Every field you add, every constraint you set, every structure you nest — all of it happens here. The schema you build in Design Mode drives both the JSON Schema export and the form layout in Data Entry Mode.
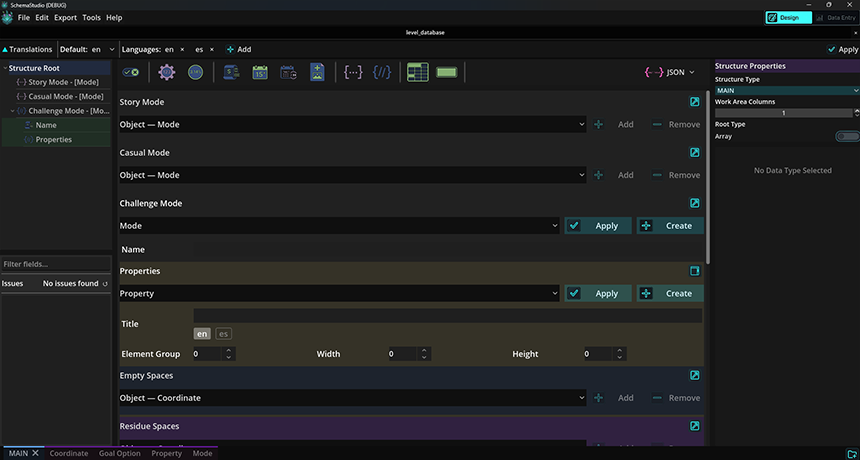
Design Mode — schema canvas with field tree (left), type toolbar, and Properties panel (right).
The canvas
The center of the workspace is the design canvas. Each tab along the bottom edge represents an independent structure — you can think of each one as a separate schema object. Fields appear as rows on the canvas in the order they were added.
Click any field row to select it. The Properties panel on the right side updates to show all available attributes for that field type.
Field types
The toolbar above the canvas contains buttons for every supported primitive and composite type. Click a type button to add a new field of that type at the bottom of the current structure. The available buttons vary slightly depending on whether the structure is set to JSON or XML output.

JSON layout toolbar

XML layout toolbar — note the additional element-type button between the code blocks and grid view icons
| Type | Description | Common attributes |
|---|---|---|
| String | Free-text value | Min/max length, pattern (regex), format, enum |
| Number | Numeric value (integer or decimal) | Minimum, maximum, multipleOf, integer-only flag |
| Boolean | True/false toggle | Default value |
| Object | Nested sub-structure with its own fields | Additional properties flag, required children |
| Array | List of values or objects | Item type, min/max items, unique items |
| Enum | String constrained to a fixed list of values | Allowed values list |
Field properties
With a field selected, the Properties panel shows all attributes applicable to that type. Common properties available on every field include:
- Name — the key used in the exported schema and data JSON. Must be unique within the structure and contain only letters, numbers, underscores, and hyphens. You can use spaces as well to be readable and when exported the spaces will be removed based on the field name format type selected in the Options menu.
- Short Description — a human-readable label. Shown in Data Entry Mode as the form field label and included in the schema's
titleproperty. - Description — optional long-form explanation. Exported as the schema's
descriptionproperty and shown as a tooltip in Data Entry Mode. - Required — marks the field as required in the exported schema. Required fields are also highlighted in Data Entry Mode.
- Default — a default value pre-filled in Data Entry Mode when a new record is created.
Reordering fields
Drag any field row up or down to reorder it within the structure. The order on the canvas is preserved
in the Data Entry Mode form layout and in the exported schema's properties object.
Nested objects
When you add an Object field, a disclosure arrow appears on its row. Click the arrow to expand it and reveal child fields. Add fields inside the object the same way you add top-level fields — click a type button while the object row is selected (or while it is expanded).
Objects can be nested to any depth. The canvas indents child rows to show the hierarchy visually.
Helper structures
If the same nested object shape appears in multiple places — for example, an Address object used on both a customer and a supplier — define it once as a separate structure tab, then reference it from other structures using an Object field with the Ref attribute set to the helper structure name.
On export, referenced structures are inlined at the point of use. In Data Entry Mode, a referenced object expands to show the fields of the referenced structure.
Deleting fields
Select a field and press Delete, or right-click the field row and choose Delete Field. If the field has children (an expanded object), a confirmation dialog asks whether you want to delete the entire subtree.
Issues panel
The Issues panel at the bottom-left of the workspace lists any structural problems detected in real time — missing Field IDs, duplicate IDs, circular references, or other configuration conflicts. Clicking an issue row selects the affected field on the canvas.
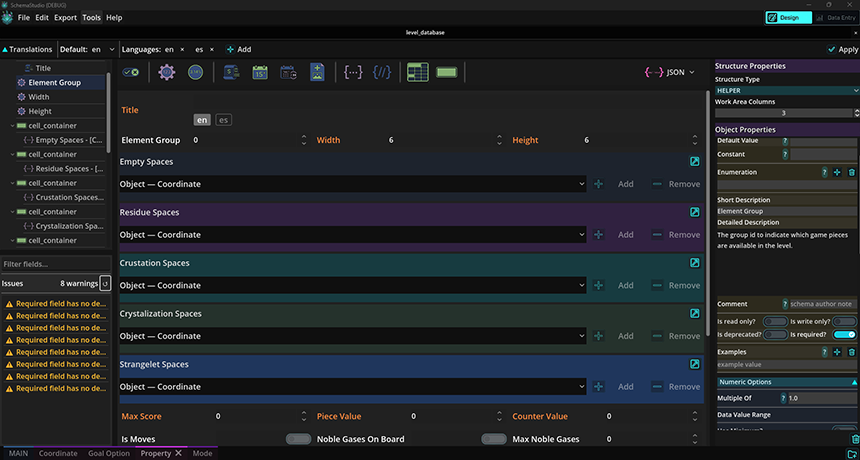
Issues panel open with warnings — each row links directly to the affected field.
A schema with open issues can still be saved, but it cannot be exported until all issues are resolved.