Data Entry Mode
Data Entry Mode turns your schema into a structured form. Every field you defined in Design Mode appears here as the appropriate input control — text box, number spinner, toggle, dropdown, or nested sub-form. Constraints you set on the schema (required fields, minimum/maximum values, allowed enumeration values) are enforced as you type.
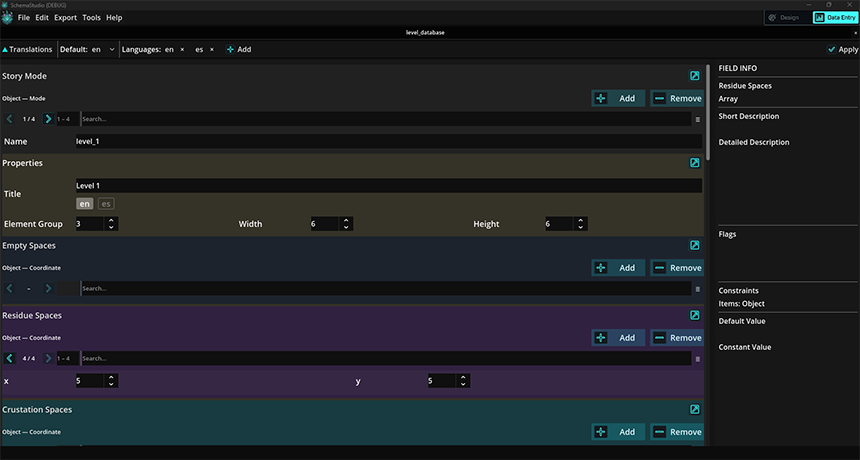
Data Entry Mode — record navigation bar, structured form fields, and Field Info panel (right).
Switching modes
Use the Design / Data toggle in the ribbon to switch between Design Mode and Data Entry Mode. You can switch at any time without losing unsaved work — SchemaStudio keeps both the current schema and the current record in memory.
Records and navigation
Each time you fill in the form and save, a new record is added to the project. Records are listed in the navigation bar at the top of the canvas. Click a record to load it into the form, or use the ← and → arrows to step through them in order.
The current record number and total record count are shown in the navigation bar: Record 3 of 7.
Adding and deleting records
- Click + in the navigation bar to add a blank record. Any default values you defined in Design Mode are pre-filled.
- Click × (or press Delete with the navigation bar focused) to delete the current record. A confirmation prompt appears.
- Duplicate the current record with Edit → Duplicate Record. Useful for records that share most values.
Field controls
Each field type renders as the most natural input for its data:
| Field type | Input control | Validation shown |
|---|---|---|
| String | Text box (single or multi-line based on schema) | Max length indicator, pattern mismatch |
| Number | Number input with increment/decrement buttons | Out-of-range highlight |
| Boolean | Toggle switch | — |
| Enum | Dropdown containing the allowed values | — |
| Object | Collapsible sub-section with its own fields | Per-field within the sub-section |
| Array | List with Add / Remove item controls | Min/max item count |
| Blob / Image | File picker or URL input with inline image preview; View Full Size opens a zoomable, pannable full-resolution viewer | File size limit (In Object mode) |
Validation
Validation runs as you fill in the form. A field with a problem shows a colored border and a short message below it explaining what needs to change. The record cannot be saved while required fields are empty or any field value violates its constraints.
The status bar at the bottom of the workspace summarizes the current record's validation state: "3 issues remaining" or "Ready to save".
Saving records
Press Ctrl+S (Windows) or Cmd+S (macOS), or click File → Save
to save the current record into the project file. Saving a record does not export it — it stores it
inside the .ssproj project package for later use or export.
Filtering records
Use the Filter Fields panel on the left side of the workspace to narrow the list of visible records. Type a value in the search box and choose a field to search within — SchemaStudio hides records that don't match. The total and filtered counts update in the navigation bar.
Exporting data
To export all records as a data file, go to Export → Export Data as JSON or Export Data as XML. SchemaStudio writes every saved record as an array of objects. Unsaved changes to the current record are not included in the export.
See Import & Export for full details.